HOW TO GUIDES

Instructional Guides

Welcome to our instructional guide section, where we focus on sharing product knowledge to solve common customer problems and elevate your projects to the next level. Our mission is to inspire and instruct, sparking your creativity by showcasing exceptional examples of designing with metal. You’ll find a wealth of information here, including best practices, project planning considerations, and DIY tips and tricks for working with cast metal products. Whether you’re a seasoned professional or a DIY enthusiast, our guides are designed to help you generate new ideas and achieve outstanding results.

HOW TO MEASURE & INSTALL LOUVERS AND REGISTER COVERS

For replacement:

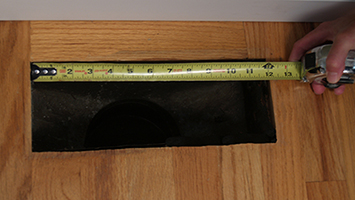
Remove your existing register to reveal and measure the opening dimensions.

The width and length of the opening must match the INSIDE dimension of the register cover you choose. (Remember, the sizing listed on all our register covers refers to their INSIDE frame dimension, so we’ve made it easy for you to choose the right size for your opening!)

how-to-measurePlease also take note of the OUTSIDE dimensions of the register cover you choose (found on downloadable spec sheets on each product page of our website). In situations where the opening is close to a wall or cabinet, you’ll need to make sure there is enough space around the opening to accommodate the overall size of the register cover.

For new installation:

Measure twice! Then cut your duct opening to match the width and length of the INSIDE dimensions of the register cover you choose. Remember to leave enough space around the opening to accommodate the OUTSIDE dimensions of the register too.


HOW TO INSTALL the LOUVER and REGISTER COVER

Step One:
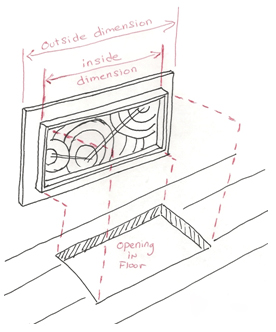
Select a louver that is the same width and length as your opening.

Step Two:
Set the louver deep enough in the duct that the register cover can be placed on top without interfering with the movement of the louver.

Step Three:
Install the louvered damper by securing it with coarse-thread drywall screws to the perimeter of the opening.

Step Four:
Place the Iron Age register cover over the louver. All register covers have drill points on either end if screw down is needed.
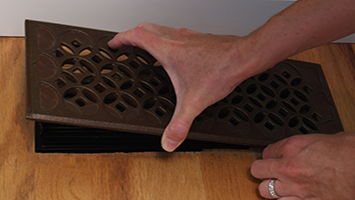
Step Five:
Take a photo of your beautiful register cover in its new surroundings and send it to us at info@ironagegrates.co.uk. If we select your photo to use on our website, we’ll send you a register cover of your choice!

RADIUS CONSIDERATIONS

Planning a radius trench project can be challenging. We can provide assistance with design, sizing, frame selection and layout concerns, but first we need to know (and you need to consider) the following:

1. We can make a grating system to fit just about any situation.
2. Your design selection, be it a currently stocked, or custom adaptation of your design and nominal size of trench cover.
3. Radius of trench, measured @ C.L.
4. Over-all length of run, that would be the C.L. arc length. OR: number of castings. Keep in mind that the length of cover castings vary w/ manufacturer of trough that our designs are intended to fit.
5. Will partial castings be acceptable? If not, over-all length must be adjusted to nearest whole grate.
6. To calculate complete circles:

Divide the C.L. circumference in inches/mm (3.1416 x dia.) by the length of your design selection – this will produce the number of castings.

There will likely be a fraction in your answer. Will partial castings be acceptable? If not, we will have to adjust either the length of the run or the radius a bit in order to accommodate.

To calculate the number of whole castings in a circle:
Take the previous fractional answer and do this simple calculation – twice:
once w/ the smaller whole number, and again w/ the next larger whole number.

# of castings x length in inches/mm divided by 3.1416 = diameter in inches/mm. Divide inches by 12 to get feet, divide mm by 1000 to get metres.

Then you must decide which of these two C.L. diameters will work for you. A custom design can accommodate any diameter in equal pieces.

7. If frames are to be included, please specify frame type and load requirement (pedestrian, med. duty, vehicular).

8. Our covers can be bolted to frames for the purpose of maintaining equal spacing between castings, tamper resistance or increasing load bearing capacity.

RADIUS FRAMES

Custom grates require frames. Frames are made from angle bar, and when bolted or “wet set” into the top edge of the drain hole, they act as a shelf or bearing surface for the grate to sit on.

Our frames are all made to order, and can accommodate many types of installation scenarios, Frame types include “embedment” for use with new concrete; “stand-off” for use with a variety of paver options; and “retro” for use with existing slabs. Please take a look at the “Frame Types” below. If you have questions please contact us and we will help you determine which frame type(s) will work best for your particular installation.